Windows Hello for Business, Overview and How to Enable via Group Policy
This KB is meant for IT Pros - if you are an end user with a university managed device and you want to utilize Hello for Business, please contact your IT Pro.
If you are an end user with a personal device and you want to set up Windows Hello, this Microsoft document should help: Learn about Windows Hello and set it up.
Click to expand the sections below:
Overview - What is Windows Hello for Business?
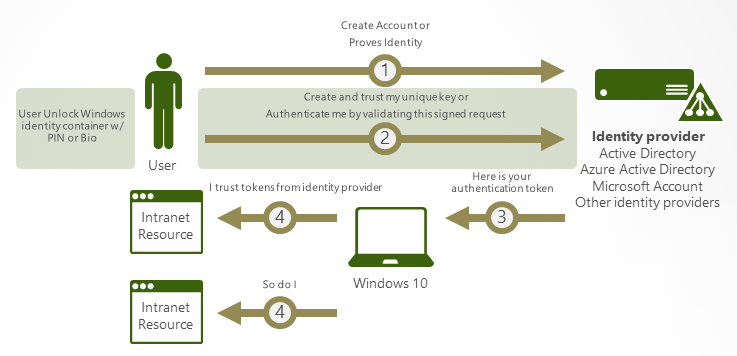
Windows Hello for Business allows users to sign into their workstations via a PIN or biometric (fingerprint recognition, facial recognition, and/or iris recognition) instead of a password. As opposed to Windows Hello, Windows Hello for Business (WHfB) is configured by group policy or mobile device management (MDM) policy and always uses key-based or certificate-based authentication, making it more secure.
After an initial two-step verification of the user during enrollment, Windows Hello for Business is set up on the user's device and Windows asks the user to set a PIN, and optionally a biometric gesture (such as a fingerprint or facial recognition). After the user provides the gesture to verify their identity, Windows then uses Hello for Business to authenticate.
Allowing users to authenticate to their workstations via a PIN instead of their password gives the user more convenience, while making them more secure. A Hello PIN is local and tied to the individual device, and is secured by the Trusted Platform Module (TPM) chip. Furthermore, any biometric data used to implement Windows Hello is securely stored on the local device only. This data does not roam and is never sent to external devices or servers. For more information about biometric authentication with Windows Hello for Business, see Windows Hello biometrics in the enterprise.
For more details on how Windows Hello for Business works, follow this link: How Windows Hello for Business works in Windows Devices.
Deployment - How can I set this up for machines in my OU?
IT Pros can enable Windows Hello for Business (WHfB) on hybrid joined Windows machines (Windows 10 1709 or later, or Windows 11). Devices joined to the ad.uillinois.edu domain should be automatically hybrid joined to AzureAD, but status can be checked by running 'dsregcmd /status' in an Administrator Command Prompt or PowerShell window.
Currently, enabling WHfB is done via GPO, however, Intune/MDM should be the path for device management and deployment in the future. Depending on your business needs, the GPO can be configured to apply to an entire organizational unit (OU), or to a security group of devices (if wanting to constrain or slowly roll out the WHfB deployment).
Once the GPO is applied to the device, device readiness can be checked via the Event Log, under Applications and Settings Logs/Microsoft/Windows/User Device Registration/Admin. Event IDs 358 (ready) and 360 (not ready) will be useful here.
- Once a user has successfully enrolled, Event ID 300 will be generated in this log.
Some things to consider:
- If you want to check out the Microsoft documentation, we are following the Hybrid key trust deployment scenario: Link to doc.
- When the user goes through enrollment, there should be an unavoidable wizard after login (unless specifically disabled via GPO). The user will need to authenticate normally via UPN/password and Duo, and then complete another factor of authentication via Azure MFA. More details on the user experience can be found in the 'User Enrollment' section below.
- After a user enrolls in Hello for Business, metadata - including the public key - is sent to AzureAD, then synced down to the user account in on-prem AD. Syncing of data between on-prem AD and AzureAD occurs approximately twice an hour so there will be some delay.
- Care should be taken when wanting to deploy Hello for Business to shared devices, as the maximum number of users enrolled in WHfB is 10 per device.
- Since each user/device pairing is unique, users will need to go through Hello for Business enrollment on each workstation that is enabled for it.
Group Policy settings for Windows Hello for Business
Windows Hello for Business policy settings are available in User configuration and Computer Configuration under Policies > Administrative Templates > Windows Components > Windows Hello for Business.
Here are some GPO settings you will want to use when deploying Hello for Business. More information can be found here.
- Use Windows Hello for Business - Set at both computer and user configuration. Set to Enabled - if not configured, Windows Hello for Business will not be enabled.
- Use a hardware security device - It's recommended to set this to Enabled for security unless some of your devices do not have TPM chips. Additional option available to exclude TPM 1.2 and only use TPM 2.0.
- Use biometrics - allows users to use fingerprint or facial recognition for login, provided the necessary hardware is present. A PIN is always required, as a backup option.
- Configure enhanced anti-spoofing - If you do want to enable facial recognition, and have compatible hardware, enabling this setting will require devices to use enhanced anti-spoofing (for example, detecting a photograph of a face instead of a real face).
This policy is located here: Policies > Administrative Templates > Windows Components > Biometrics > Facial Features > Configure enhanced anti-spoofing.- It should be noted that biometric data is stored securely and locally on the device and will never be sent to Microsoft or to the University. More information is available here.
- PIN Complexity - Various settings available here, including max/min PIN length, PIN expiration policy, PIN history policy, and character requirements.
This policy is located here: Policies > Administrative Templates > System > PIN Complexity.
Default behavior:- Minimum PIN length of 4.
- Max PIN length of 127.
- Only digits, no letters.
- PINs do not expire, and PIN history is not kept.
How to check device readiness
IT Pros can check the enrollment readiness of a device via the Event Log and PowerShell.
In order to enroll in Windows Hello for Business, the device needs to be hybrid joined to the on-prem ad.uillinois.edu AD domain and AzureAD. Once you join the device to on-prem AD, please allow time for the device to join to AzureAD. The AzureAD Connect sync happens approximately twice an hour. Hybrid join state can be checked via running the following command via PowerShell or Command Prompt: dsregcmd.exe /status
- Near the top of the output, look for the following under 'Device State':
AzureAdJoined : YES
There are other readiness checks that need to happen before enrollment can proceed. In the device's Event Log, navigate to Applications and Settings Logs > Microsoft > Windows > User Device Registration > Admin.
- Event ID 360 indicates that one or more readiness checks failed. More details can be found in the details for the logged event.
- Event ID 358 incidates that the device is ready. Checking the details of the event will reveal details, but the important bits are below.
- Windows Hello for Business provisioning will be launched.
Device is AAD joined ( AADJ or DJ++ ): Yes
User has logged on with AAD credentials: Yes
Windows Hello for Business policy is enabled: Yes
Windows Hello for Business post-logon provisioning is enabled: Yes
Local computer meets Windows hello for business hardware requirements: Yes
User is not connected to the machine via Remote Desktop: Yes
User Enrollment - What Will Users Experience When Enrolling in Hello for Business?
Users must complete strong authentication when signing up for Windows Hello for Business. This means that they must complete the normal AzureAD sign-in process of entering their UPN/password and authenticating with Duo. Additionally, users must complete an additional factor of authentication via Azure MFA. We recommend using the Microsoft Authenticator mobile app (available for Android and iOS), however phone call and/or SMS can also be used. Authentication methods subject to change.
- Users will typically only have to authenticate via Azure MFA during Hello for Business enrollment. Duo remains our MFA provider for all other applications at this time.
Additionally: As mentioned above, the public key needs to be synced from AzureAD to on-prem. Once the user completes enrollment, the public key is registered in AzureAD. AzureAD Connect will then sync the public key to on-prem Active Directory. The user won't be able to use WHfB for authentication until the synchronization has completed. The sync interval is every 30 minutes, so give it an hour just in case.
The below screenshots show the user experience when signing up for Hello for Business and Azure MFA.
- Welcome screen - depending on GPO setting, the user will either see this upon signing in, or can initiate this by going to Settings -> Accounts -> Sign-in options

- After authenticating with UPN/password and Duo the user needs to sign up for Azure MFA. If the user is already signed up, they will be prompted to complete authentication (skip to step ##).

- Authentication methods displayed. Phone is the default option, however we recommend the mobile app.

- For the mobile app, for convenience, select the option to receive notifications for verification.

- Next, the user needs to install the Microsoft Authenticator app from the app store of your choice (Android and iOS). After installation, they will tap on the option to add an account, select 'Work or school account', and select the option to scan a QR code.


- After successfully linking the mobile app with their account, they can proceed to the next step.

- A test push notification is then sent to the user's phone.


- Next, the user will need to add their phone as a backup authentication method.

- The user can then set a PIN. IT Pros can set PIN length and complexity restrictions via GPO.

- Depending on GPO settings and hardware compatibility, IT Pros can choose to enable the option for biometric sign-in via facial or fingerprint recognition.

Frequently Asked Questions
Answers to commonly asked questions about Windows Hello for Business can be found here.
If you have any questions not answered here, please feel free to reach out to AD Support at adsupport@illinois.edu.