Office 365, Email Administration, Support, and Best Practices
Table of Contents
- Office Training
- Types of Resource Accounts
- Resource Account Scheduling and Calendar Options
- Resource Scheduling
- Best Practices for Creating, Managing, and Deleting Email Resources
- Deleting a Resource Mailbox
- Distribution Groups, and Departmental Shared Email accounts
- Email Delegates
- Change How Much Mail to Keep Offline with Cached Mode
- Impacts of a Changed NetID
- Auto-Reply and Out-of-Office Messages
- Viewing Mail Headers
- Creating an Email Signature
- Outlook Calendar Sharing
- Clearing Outlook Auto-Complete Cache
- Outlook Message Encryption Options
Office Training
Microsoft's online Office 365 training can be found at the Office 365 Training Center.
Training Services (formerly FAST3) provides Office 365 application training that can be found on the Webstore.
LinkedIn Learning (formerly Lynda.com) provides Office 365 training through the Illinois LinkedIn Learning portal.
Types of Resource Accounts
There are several types of resource (e.g. non-person) mailboxes, shared mailboxes and calendars, equipment and room accounts, and unified groups:
Unified Group
Unified groups can be created in Outlook by everyone. Unified groups get a shared mailbox and calendar. Ownership is controlled by the creator of the group and anyone they delegate ownership to. More information on Unified Groups is available here: Learn about Groups in Outlook.
User Mailbox
User Mailboxes operate like a normal mailbox. They're normally used when multiple need to access the same shared mailbox.
Room Mailbox
Rooms in Exchange can be reserved for meetings and other events. This includes conference rooms and other meeting spaces. Room-type mailboxes have additional booking features called Resource Scheduling available through Outlook on the web and is listed as type "Room" in the Global Address List.
Equipment Mailbox
Equipment can also be reserved through Exchange. This typically includes objects like laptops and projectors, but could include any type of equipment. Equipment-type mailboxes have additional booking features called Resource Scheduling available through Outlook on the web and is listed as type "Equipment" in the Global Address List.
Resource Account Scheduling and Calendar Options
Room and Equipment-type mailboxes can be set up to handle reservation requests in one of two ways:
- Moderated: Requests to reserve the room or equipment must be accepted or declined manually. This provides you with oversight to the resource and allows you more control over who has access to the resource and at what times.
A moderated resource must have at least one delegate who is responsible for accepting or declining reservation requests, and it can have many delegates associated with it if you desire. When a request to reserve a room or piece of equipment is made, an email is sent to the delegate(s) for the resource. A delegate can accept or decline requests to reserve the resource, just like a person accepts or declines meeting requests for his or her own calendar. Delegates will also need to approve or deny updates to the meeting that change date and/or time.
- Auto-Accept: Requests to reserve the room or equipment are handled automatically. No one is responsible for accepting or declining reservation requests on behalf of the resource. This provides you with an easy way to manage resources that are up for grabs in a first-come, first-serve way.
Exchange will always accept reservation requests so long as the following criteria are true. If one or both of the criteria cannot be met, Exchange will automatically decline the request.
- The room or piece of equipment is available (i.e. someone else has not already booked the resource for the requested date and time).
- The request falls within the resource's booking window.
Room and Equipment-type resource accounts have their own calendars, which can be viewed and modified just like a person's calendar. When a request for a room or piece of equipment is accepted in Exchange, an event is added to the resource account's calendar.
Booking Window
As indicated above, if a room or piece of equipment is configured to auto-accept and a request is made to reserve the resource outside of the booking window, Exchange will decline the request.
For example, if you try to reserve a room one year from now (i.e. 365 days from now) and that room is set up to auto-accept, your request will be denied because it falls outside the booking window (which is 180 days by default). However, if you try to reserve that same room three months from now (i.e. 90 days from now), Exchange will automatically accept your request because it falls within the booking window.
Resource Scheduling
As an owner of a resource, one of your first responsibilities is to set the required options/settings/permissions for the resource. Outlook clients will only allow you to set read/write permissions for a resource calendar. Many of the other options/settings (eg. available hours, length of events, who can schedule, etc.) must be set via Outlook on the web.
| Process event invitations and cancellations | Enables or disables all options below as well as the options under Scheduling Permissions. If checked, all options below are enabled.
If not checked, the owner of the resource resource must manage every request manually by accessing the resource directly. Delegates of a resource can also manage the request on behalf of the resource. Important: If automatic processing is enabled and a delegate has been set, the setting for the delegate must be set to Both my delegate and me for invitations to be processed by the resource. |
| Turn off reminders | Enables or disables reminders for events in this calendar. This applies only for the resource; the organizer and attendees will still receive reminders if they have elected to do so. |
| Maximum number of days in advance resources can be booked | Limits how far in advance an event can be scheduled. The default is 180 days. 1080 is the maximum. If you schedule an event beyond the maximum number of days specified, the event will be automatically declined. |
| Always decline if the end date is beyond this limit | Requests beyond the maximum number of days specified will be automatically declined. Valid values are between 0 (today) and 1080 (about 3 years). |
| Limit event duration and maximum allowed minutes | Limits the amount of time which a room can be scheduled within a single day. Unchecking the box will mean a meeting has no limit. Checking the box allows for a limit between 0 to 1440. |
| Allow scheduling only during working hours | If checked, an event can only be scheduled during the hours specified under Calendar Work Week in the Calendar tab. Events outside of working hours will be automatically declined. |
| Allow repeating meetings | Allows booking of the resource room at a regular interval. The event can be set to repeat over a specified duration of time. This is also known as a recurring booking. |
| Allow conflicts | Allow or prevent conflicting meeting requests (a "Double Booking"). If Repeating meetings and Allow conflicts are both enabled, this will only allow conflicts on repeating meetings. Additionally, in order for the resource to allow conflicts, when the resource is invited it will need to be entered into the Attendees field as opposed to being chosen with the Add Rooms button. |
| Allow up to this percentage of individual conflicts | This setting specifies the maximum percentage of meeting conflicts that are allowed for new repeating meeting requests. The same idea as with the individual conflicts field applies, but in this instance a percentage of conflicts allowed is specified. |
| These people can schedule automatically if the resource is available | By default, Everyone can schedule this resource without manual approval by the resource. If Select users and groups is selected, only the users and groups specified can schedule automatically. All other users or groups will receive a decline message. If Select users and groups is selected but no users or groups identified, this option will be ignored. |
| These users can submit a request for owner approval if the resource is available | If Everyone is selected, then all requests must receive manual approval by the resource. If Select users and groups is selected, only the specified users and groups require manual approval by the resource. Select users and groups is selected and left blank by default so that all requests are approved automatically. |
| These people or groups can schedule automatically if the resource is available and can submit a request for owner approval if the resource is unavailable | When Everyone is selected (default) any request during an open time frame will be automatically approved. If the room is booked at the requested time, a form is submitted to the resource for manual approval. If Select users and groups is selected, only those specified will have the option to have the request manually approved; all others will have a conflicting request denied without the option of manual approval by the resource. |
Configuring Resource Scheduling options
The settings in the Outlook web app allow you to set the booking options for room and equipment mailboxes:
- Login to https://outlook.office.com. (Note: You must login using account credentials. Full access rights will not be sufficient.)
- Click the gear icon to open the quick setting menu.
- Scroll down and click on Calendar
- In the left column, click on Resource scheduling
This will give you most of the options needed to configure bookings for room and equipment mailboxes.
The default action is for resource mailboxes to use Auto-Accept. If the resource is being moderated and you want to switch to Auto-Accept, then you will need to check the box next to Automatically process event invitations and cancellations.
Best Practices for Creating, Managing, and Deleting Email Resources
How to create and request a resource mailbox (User, Room, & Equipment)
- Create an object in your UOFI OU that will be associated with your resource. Name this object in accordance with the following rules:
- An object name must be nine characters or longer and/or contain a hyphen so it does not conflict with a NetID.
- An object name may not have spaces. (Hyphens are a recommended substitute for spaces.)
- An object name SHOULD adhere to the format of dept-building-resource or dept-resource.
- Examples include: TechSvc-DCL-L532, TechSvc-dcl-l410projector, etc.
Decide if you want separate groups for full-access and send-as permissions (details on these two permissions here: Manage permissions for recipients). Create a Universal Security group or two in your OU that will be granted full mailbox access and/or send as rights over the resource object. Members of that group will inherit the permissions.
For example, if your resource object is named tech-svc-dcl-l410, your groups should be named tech-svc-dcl-l410-FA, tech-svc-dcl-l410-SA, or similar. FA is short for full-access and SA is short for send-as.
- Populate the FA and SA groups with the user objects you wish to have full control and/or send as rights over this object.
- Send an email to exchange@illinois.edu and request that your resource account be mail-enabled and that the group(s) that you have created be given full-access/send-as rights to that mailbox.
Please be sure to specify the type of resource (user, room, or equipment) that you would like created. By default, all resource accounts use @mx.uillinois.edu email addresses unless otherwise requested.
- If you want an @illinois.edu departmental shared email, you'll need to submit a Departmental Shared Email request. Once the departmental shared email has been approved and created by Identity and Access Management (IAM), the Exchange team can update the primary SMTP to have a proper @illinois.edu address. The IT Pro will want to make sure the Illinois departmental shared email points to the @mx.uillinois.edu address in the Electronic Directory Editor.
Deleting a Resource Mailbox
Deleting a mailbox can be done by simply deleting the User AD Object. The Object will be soft deleted for 30 days and can be recovered by submitting a ticket to the IAM team. If however, you still need the AD User object for functions besides email and only want the mailbox removed, send a ticket to exchange@illinois.edu to have the mailbox disabled.
If you need to save emails from a mailbox before deleting it, there are several ways to do this:
- Load the mailbox in the Outlook desktop client and archive the account in a .pst file.
- Log into the mailbox that will be deleted and a mailbox that you would like to back up the emails to, then copy the emails from one to the other.
- Forward the emails from the mailbox that will be deleted to an email that will back them up.
Distribution Groups and Departmental Shared Email Accounts
Distribution groups, like resource accounts, can be managed in the Active Directory, but serve a different purpose.
Difference between mailing lists, a group email accounts, and departmental shared emails
- A mailing list is a system that distributes email to a range of subscribers. Email sent to a mailing list address can be controlled and verified in various ways before it's distributed to the subscribers' personal email addresses. A mailing list is not associated with any Illinois Directory information, such as telephone numbers, fax numbers, or street addresses. Searching for a mailing list's email address in the directory is unlikely to return results. These can be requested by following these steps: Campus Mailing Lists, Request a new list.
Mailing lists are best suited for:
- Communicating with interest-based groups
- Allowing individuals to join and leave a group of their own volition
- Communicating with groups that include non-University members
- A distribution group is an Active Directory object that can also be used to distribute emails among the members of a group, but cannot be subscribed to or unsubscribed from the same way a mailing list can. IT pros can manually add or remove members from a distribution group. Distribution groups can also be used for access permissions, such as Full Access or Send As permissions to a group email account.
- A group email account is a single email account that can be accessed by a range of people. In contrast, a departmental shared email is an entry in the Illinois Directory with a range of information about a particular group (or unit). A group or unit alias can have telephone number, fax number, street address, email address, web, and other information associated with it.
- A departmental shared email (formerly known as group alias) can have only one email address associated with it. That associated email address can belong to an individual, to a mailing list, or to an email account that a department accesses. However, a group alias cannot directly handle email distribution services to a range of people.
Creating a distribution group
- Create a new Universal Security group in the UOFI domain. (See "The Universal Security Group requirement" below for the reason behind this choice.)
- Populate the new group with the users that you would like. Other groups can also be added, and members of those groups will also receive distributed mail and associated permissions.
- Email exchange@illinois.edu with the following information:
- The distribution group name
- Desired delivery restrictions (none, UIUC email addresses, group members only)
- (Optional:) Any additional email addresses that should be added to the group (such as @illinois.edu or @dept.illinois.edu)
Note: The default delivery restrictions for distribution groups will reject email from external sources.
Converting distribution groups to shared mailboxes
Unfortunately, unlike a user mailbox, a distribution group cannot be changed directly into a shared mailbox. You will need to delete the existing distribution group mailbox and recreate the object as a shared mailbox.
The Universal Security Group requirement
When you create a distribution group in Active Directory, you have three choices for scope (domain-local, global, or universal) and two choices for type (security or distribution). The only group scope that Exchange can mail enable is Universal. Exchange can mail enable a Universal Security or Universal Distribution group type. A Universal Security group can be mail enabled AND used for permissions. A Universal Distribution group can only be mail enabled, it cannot be used for permissions. Technology Services asks for new groups to be created as Universal Security groups since that option offers the most flexibility.
Creating a departmental shared email
Navigate to the Departmental Shared Email form. New users will see a pop-up asking permissions for the Office365Users connector. This is so the form can do validation on alias proxies. Once the alias for the departmental shared email has been created, you will use the Electronic Directory Editor (EDE) to add and maintain information in the entry.
Email Delegates
Similar to having an assistant that helps you manage your incoming paper mail, another person, known as a delegate, can receive and respond to email messages and meeting requests and responses on your behalf. You can also grant the delegate additional permissions to read, create, or change items in your mailbox.
Adding and managing delegates
The steps to add and manage delegates will differ slightly between Microsoft Windows and Apple macOS.
- Share and access a calendar with edit or delegate permissions in Outlook
- Add and manage delegates in Outlook for Mac
Delegates can only be edited if you are logged into an account as the account itself from Outlook Desktop or in Outlook on the Web. If you are only viewing a shared calendar, you will not be able to manage Delegates.
Using your delegate permissions
Please see Microsoft's documentation for managing someone else's email and calendar: Allow messages to be sent on your behalf when sharing a folder or mailbox
Delegation does not mean you have Mailbox access to view the mailbox of your Delegator. If the delegate needs to actually see the mailbox and folders it contains, the delegator needs to add permissions manually to all the folders the Delegate needs to see. If they need to see the entire mailbox and all the folders then permissions need to be added to the NetID@illinois.edu top folder that sits above the Inbox folder. You can learn more about sharing here: Share and access another person's mailbox or folder in Outlook.
Change How Much Mail to Keep Offline with Cached Mode
It is considered best practice to set this setting to All. Note that All has a maximum of 50GB of cached data. If your mailbox is larger than 50GB some folders (even in cached mode) will be slow to load as your Outlook client retrieves the emails from the Exchange Server. With an Exchange Online account, you decide how much mail is available when working offline with a slow or no network connection.
To change your email caching preferences:
- Click File > Account Settings > Account Settings.

- Select an Exchange account, and then click Change.

- Under Offline Settings, set the slider to your desired time frame which ranges from 3 days to All Email. Cached Exchange Mode, which downloads a copy of your messages, must be turned on. We recommend using "Cached Exchange mode" for Outlook on Windows, as it allows for a faster experience using Exchange, offline mailbox access, and a reduced load on the servers.
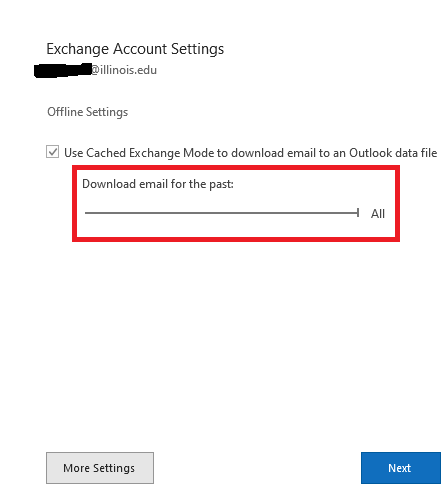
Note: This should be change to "All" before archiving or exporting mail in order to ensure all mail is included in the archive file.
Impacts of a Changed NetID
When a NetID is changed, the Exchange username will be updated within 2 business days. You should continue to use your original username until it fails to work, and then you should switch to the new username. Your Active Directory password will remain the same during a NetID change. Your email address will be updated to reflect the new NetID, and you will continue to receive mail at the old address for one year.
Auto-Reply and Out-of-Office Messages
- Log in to the Outlook Web App: https://outlook.office.com.
- Click on the Gear Icon at the top right of the window.
- Type Automatic in the Search settings field and select Automatic replies.
- Toggle on the option Turn on automatic replies.
- You can then select a time frame during which you would like this out-of-office message delivered
- You also have the ability to set two separate out-of-office messages, or configure just one and not the other:
- By default, all out-of-office replies are delivered only to other Illinois Exchange accounts that send you an e-mail.
- By checking the Send replies outside your organization, out-of-office replies will be delivered to all non-Exchange e-mail addresses (including non-Illinois addresses and undergraduate Google Apps addresses). By default, selecting this option sends auto replies to everyone. You can further select it to just reply to contacts in your Contacts lists.
- Click the Save button save your changes
If you need to set up an out-of-office message for someone else, please fill out the Out of Office Request form.
Viewing mail headers
To access Internet Mail Header information for an email:
- Log in to the Outlook Web App: https://outlook.office.com.
- Locate the message you would like to view the headers for and open it.
- Click the (...) button next to the reply and forward buttons, then select View > View message details.
Creating an Email Signature
For full instructions for all versions of Outlook please see Create and add an email signature in Outlook. Otherwise, follow these instructions for Outlook on the Web:
- Log in to https://outlook.office.com.
- Click on the Gear Icon at the top right of the window
- Type Signature into the Search settings field, and select Email signature.
- Enter your signature into the Email signature pane, then click Save.
- Under the Select default signatures header, you can choose which signature is used for new messages and replies.
I your signature causes New Compose or Replies to open up completely blank; This problem is common when there is a complicated signature configured on the mailbox. Often there are links or other HTML code embedded in the signature that Outlook on the Web attempts to load into the new Meeting or new Message dialog box. This HTML code confuses Exchange and needs to be removed.
The Office of Strategic Marketing & Branding offers a signature generator.
Outlook Calendar Sharing
Microsoft has several documents for sharing your calendar with others or viewing calendars shared with you.
Open another person's Exchange Calendar
Import events from an .ics file
Clearing Outlook Auto-Complete Cache
You may need to clear the auto-complete cache periodically. This will help correct incorrect email addresses caused by NetID changes, primary SMTP address changes, or AD object name changes.
- Click File > Options > Mail.
- Under Send messages, click Empty Auto-Complete List.
- Click Yes in the confirmation window.
Note: As of 5/30/2025 this feature does not exist in New Outlook, You have to either delete entries one at a time by manually searching or switch back to the Classic Outlook Experience.
Instructions for Outlook 365 on Mac can be found here: How the Recent Addresses feature works in Outlook for Mac.
Outlook Message Encryption Options
Microsoft offers a number of encryption options for outgoing email from Outlook and Outlook on the web. You can read about their functionality and options here: Send S/MIME or Microsoft Purview encrypted emails in Outlook.