Microanalysis - Elemental Analysis Method for Halide via Oxygen Combustion Flask and/or Ion Selective Electrode (ISE)
University of Illinois Champaign-Urbana
School of Chemistry
Microanalysis Laboratory
Elemental Analysis Method for Halide via Oxygen Combustion Flask
and/or Ion Selective Electrode (ISE)
Contents:
Summary
Equipment and Chemicals
Important equipment notes
Important interference notes
Procedure
Calibration Standards
Known halide salt standards
Electrode Use
General
Is the electrode working?
Direct addition
Calibrating
Limit of detection
Dilution and concentration of standards
Combustion Flask
Sample preparation
Combustion
Washing/dilution of sample
Analysis
Further Sample Prep
Troubleshooting
Equipment and Chemicals
Fisher Scientific
13-641-877 Chloride standard, 100PPM, 475ML
13-299-87 Chloride standard, 1000PPM, 475ML
13-641-872 Fluoride standard, 100PPM, 475ML
13-641-871 Fluoride standard, 0.1M, 475ML
13-641-866 Bromide standard, 0.1M, 475ML
13-641-869 Iodide standard, 0.1M, 475ML
13-642-633 Opt. Results B Fill Sol.: Cl, CN, Pb and Ag/S ionplus ISE
13-642-632 Opt. Results A Fill Sol.: Cd, Ca, F and S ionplus ISE
13-641-161 Opt. Results D Fill Sol.: Br, Cu and I ionplus ISE
13-641-852 Ionic Strength Adjuster (ISA), 475ML
13-641-874 Total Ionic Strength Adjustment Buffer (TISAB III), 475ML
NC9991185 Thomas Sample Wrapper, White, Paper Flag, 100/pack
NC9695027 0.1N Sodium hydroxide solution, 500ML
13-642-267 IonPlus Combination Chloride Electrode w/ BNC
13-642-265 IonPlus Combination Fluoride Electrode w/ BNC
13-645-158 IonPlus Combination Bromide Electrode w/ BNC
(New catalogue number? 13-299-89)
Ionplus Combination Iodide Electrode w/ BNC
Accumet Meter AB250
Accuflex Electrode Holder
Pipettors
500mL Combustion flask
Stopper with ground joint and platinum sample carrier
Exeter
0240-1147B Platinum gauze to form butterflies/baskets, which the SCS Machine Shop attaches to the stem of the combustion flasks.
Cole Parmer
EW-06073-45 PTFE Joint Sleeves for Standard Taper Size 34/45
Stockroom, other vendors and lab systems
Deionized H2O (From the system in room 54.)
Stockroom - 30% Hydrogen Peroxide, Ultrex Ultra pure reagent
Stockroom - 1N KOH, 1000mL
Stockroom - Beakers, volumetric flasks, stir bars
Stockroom - Cleaning solution 7%
Important Equipment notes:
The ISA and TISAB III boosters have a shelf life of 6 months after being opened and a shelf life of 2 years unopened. They do not have expiration dates on the bottles, so make sure that you label each bottle with when they were received and then when they were opened.
Electrodes should be stored in a beaker with liquid (either a low concentration of the target halide or deionized water) covering the bottom of the electrode, so that the filling solution that escapes does not dry into crystals that harm the electrode. Occasionally move the electrode sleeve up and down to make sure that crystals do not form at the top of the electrode as well. If the electrode will not be used for a long time, drain the electrode and let it dry. Maybe fill the inside sleeve with deionized water and let that drain out, so that anything still left in the electrode isn’t able to form large crystals.
Every container, flask, stir bar, etc. needs to be clean and dry
before using. The combustion flasks must not have any trace whatsoever of organic/flammable solvents. The cleaning solution is made with (amount of soap), mixed with tap water, in a tub next to the sink. Items should be soaked for a bit, swirling around in the water to make sure that all surfaces are coated and cleaned. After soaking, the items should be rinsed with tap water, making sure that there are no traces of the soap. Then rinse with the deionized water and then let the item air dry.
Make sure that the needed electrode works before preparing the combustion flask. Given small available amounts of sample, there may be only one chance to combust it.
Important interference notes:
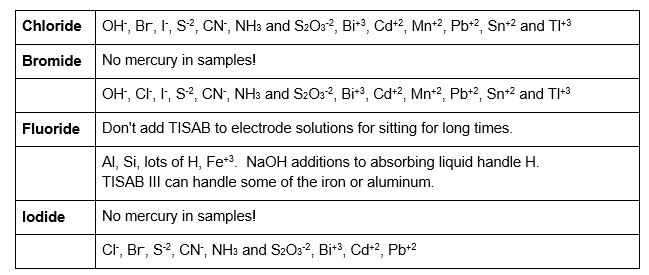
Compounds with multiple halides in the solution may show interference from these other halides. It may be hard to impossible to read both accurately.
Other elements may cause interference with the electrode. See each electrode manual for more details than below.
Calibration Standards
How long are they good for? A week? A month? Previous methods said a month.
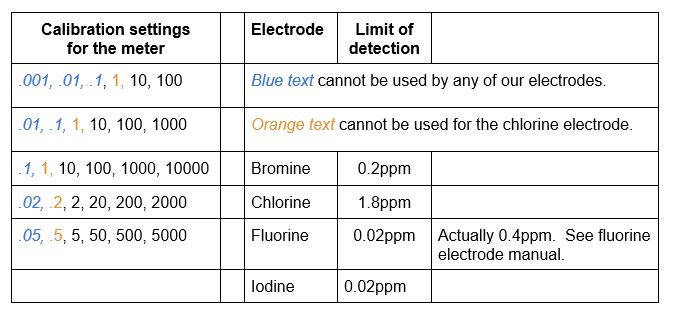
Calibration standards are needed to a) make sure that the electrode is working correctly and b) setting the meter for proper readings. The calibration standard solutions are considered good for one month. The meter can do a five-point calibration slope, but can use a two-point calibration. Use at least two standards, bracketing the sample, preferably with a difference of a factor of ten. The meter uses these available calculation lists:
When solutions are read via the ISE, the beaker composition of the standards should be the same as what the samples will be. If the sample will be [X mL sample solution + needed booster], the standard will also need to be [X mL standard solution + needed booster].
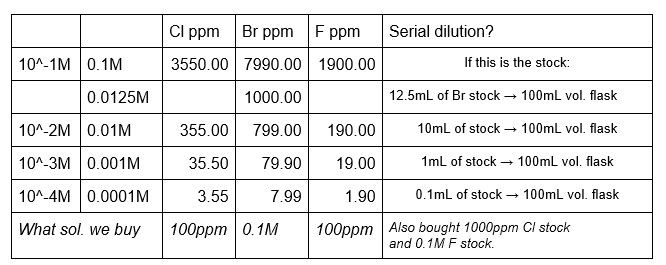
Calibrations standards are made using the Orion standards and deionized water to the desired concentrations. Calibration solutions can be made with the booster already as part of the volumetric flask solution or the booster can be added directly to the analysis beaker. Whichever method is used, use the same method for both the calibration solutions and the sample solutions. If the booster is added to the calibration solutions, do not add the booster to the solutions that will be diluted to make other solutions. Only the ‘final’ flask in the dilutions should have the booster added.
Known standards for qualitative checks
How long will this be good for? Need to decide how close a reading needs to be to count. Make it up just by dissolving in deionized water? Or do the combustion flask?
Make up a solution of the halide you will be analyzing. It should be around the same range as the sample, or at least within the range of the calibration standards. The lab has NaBr (from the x-ray lab), NaCl and NaI (from the stockroom), and NaF (our own) for making these standards. When analyzing, use the same amount of solution and booster as the calibration standards and client samples.
Electrode use
General electrode use
All solutions should be at the same temperature, generally room temp.
All solutions should be run at the same stir speed.
Make sure that enough filling solution is in the electrode.
Rinse off in between each solution with sprays of deionized water.
Blot off the bottom of the electrode afterwards with a kimwipe.
When putting the electrode into any solution, remember to make sure that
no bubble is clinging to the bottom of the electrode. Put the electrode in, then remove, then in, then remove, then back in. The electrode is held at most times in a plastic holder that keeps the electrode in place. A piece of styrofoam is placed between the beaker and the stir plate to keep any heat from the plate from the solution. All solutions for the day should be at the same stir rate, via a small clean stir bar added to each beaker.
After inserting the electrode, let it sit for a minute and a half and then take whatever reading after that time and a STABLE notice. Low concentrations may need a longer stabilization time.
At small vol amount, just need to swirl the mix together and then read, not stir bar? From the bromine electrode manual. But what is considered ‘small’?
Confirm that the electrode is working
The fluid inside each combination electrode is specific to that electrode. A Fill Solution for the fluoride electrode, B Fill Solution for the chloride electrode and D Fill Solution for the bromide and iodide electrodes. The level of the solution drops over time, as it either evaporates from the filling hole (which should be left uncovered while analyzing) and through the junction at the bottom of the electrode. The level of the filling fluid should be at least an inch above the level of the solution being analyzed/calibrated and definitely above the metal spot that is the reference electrode.
Make sure that the sleeve on the electrode is able to move and liquid moves from the bottom of the electrode.
The electrode can be checked for working ability by hooking it into the meter and seeing if there is a response. The electrode can be calibrated (see below) or you can use direct addition.
Direct Addition: In a 150mL beaker, place 100mL of deionized water, the proper amount and type of booster and a stir bar. Set the meter to mV mode and insert a cleaned, blotted electrode into the solution.
Pipette 1mL of standard solution into the beaker. After the
minute and a half and a STABLE reading, take an mV reading and record it.
Pipette 10mL of the same standard solution into the beaker.
After the minute and a half and a STABLE reading, take an mV reading and record it. The difference between the two readings, called the slope, should be in the range of 54-60mV per decade of difference between the concentrations of standard. If the slope is not within that range, see Troubleshooting.
Calibrating
Whatever method is used for calibrations, the beaker composition of the standards should be the same as what the samples will be. If the sample will be [X mL sample solution + needed booster], the standard will also need to be [X mL standard solution + needed booster]. If the ISA/TISAB is pre-added to the sample, it should be pre-added to all of the standards used too.
If you get a Slope Error, something in the concentrations has gone wrong.
This error is from when the slope between two points (separated by a factor of ten) is less than 15mV or greater than 90mV. This is either from the calibration solution not being right or when the booster amount is not the same between all solutions.
See the list above for the concentrations that the meter will accept for calibrations. Also note the limit of detection of each electrode. If you test below that limit, your results will not be accurate.
The electrode should already be hooked up to the meter and working.
Make sure that the appropriate filling solution has filled the inside of the electrode above the reference point. Also make sure that the filling hole is not obstructed. If the electrode has been sitting in deionized water for a while, let it sit in the lowest or middle calibration concentration beaker to acclimatize it. Run the lower calibration concentration, then move up to higher. Remember to rinse off the electrode after each analysis with deionized water, blot the end of the electrode with a kimwipe and perform the procedure for making sure that there is no bubble on the end of the electrode. If the electrode needs to sit for a while in solution, it is better for the solution to be a low concentration, rather than a high one, but not deionized water.
The calibration should be rechecked at least every two hours. Check the first standard solution or, if using more than two calibration standards, use one in the middle. If the value has changed by more than 2%, recalibrate the electrode.
Combustion Flask
If a sample is not dissolved in an aqueous solution, the sample will need to be combusted so that the halide is freed from the compound. A clean combustion flask is prepared with an absorbing liquid and a paper flag containing the sample is enclosed in a platinum holder. The flask is purged with oxygen, the flag is lit and the stopper with the lit flag is placed into the flask. The halide gas is then absorbed into a liquid, which is then used for the analysis.
Absorbing liquid:
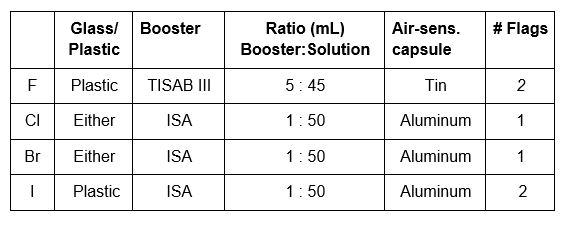
Chloride/Bromide 10mL H2O + 1mL 1N KOH + 6 drops H2O2
Fluoride 10mL 0.1N NaOH
Iodide 10mL 0.1N NaOH + hydrazine sulfate + 6 drops H2O2
The combustion flask should be clean and have no trace at all of organic solvents, which might explode when combusted in the stoppered flask. Each flask has a glass stopper which has a platinum stem, which has a platinum holder at the end of the stem. The holder is made from platinum gauze which is attached to the stem by the SCS Machine Shop. As the holders are subjected to heat and flexing, they give out after a while and fall apart. Be careful with the holders, especially as they get weaker.
Sterilize the weigh boat (if being used) and the platinum holder in the upper part of a bunsen flame. Do not melt! Let cool.
The sample will be placed into a paper flag that will be wadded/folded up and placed in the platinum holder. The flag is too light and unstable for placing on the balance and weighing the sample directly onto the flag, so you will need some kind of weigh boat. If needed, preshape the boat to form a spout. The flags should be folded in multiple ways so as to create many creases to hold the solid sample safely and so the sample does not fall out when the holder is flipped upside-down.
Use 2 paper flags on all fluorine samples. Use multiple flags on gelatin capsules.
Suggested amounts based on theoretical concentrations:
2-19% = 10mg, 19-38% = 5mg, 39-99% = 2.5mg
Make sure that all of the sample is transferred to flag out of the weigh boat. Visually or reweigh the boat after the transfer to get the weight that went into the flag?
For liquid or air-sensitive samples:
Aluminum capsules should be used for bromide, chloride and iodide, tin for fluoride. The capsules will need to be crimped shut with a tool.
The capsules hold less than 50uL of aqueous solution.
If you need to use more, you will need to use the gelatin capsules in the drawer and will have to also run a blank to account for any halides inside the gelcaps.
Place the capsule in the creases of the flag.
Once the sample/capsule is all in flag, fold flag over and over and over, leaving a tail to set on fire. If using 2 flags, wrap around leaving at least one tail out. Once the sample is wrapped, place the wrapped package in a cooled platinum holder attached to a combustion flask stopper. Light the bunsen burner if the samples will be lit soon.
The absorption liquid needs to be purged with oxygen. The liquid must be saturated with oxygen for the best flame results. Open up the system for the oxygen tank designated for halide use and place the combustion flask to be used (along with its absorption liquid) into the purging apparatus. Let the flask purge for 5 min (at about 60psi?), occasionally swirling the liquid around in the flask to get more oxygen into the liquid.
Once the five minutes are up, remove the flask from the purge apparatus. (If multiple samples are to be combusted, place the next flask in line into the apparatus.) Place a hand over the top of the flask and bring it over to near the bunsen burner. (You may want to put on safety gloves at this time.) Using the lit burner, light the tail of the appropriate sample, make sure that the flame has caught well and then put the stopper firmly into the flask. Be careful! The stopper may try to pop out from the change in air pressure! Don’t let that happen, as you may lose halogen gases. Carefully turn the flask so that the absorbing liquid flows down into the neck of the flask, sealing the flask shut. If the sample does not burn well, make sure to note that in the results. Also note if any liquid leaves the flask from being turned upside down/so the liquid is in the neck, especially if that happens after the sample has begun to smoke, as the liquid may have absorbed some of the halides already before being lost from the flask.
If the sample is still burning, don’t let burning pieces fall into the liquid. The goal is to burn the sample completely. A well burnt sample will probably produce a lot of smoke inside of the flask. After the sample is burnt/done burning, shake the flask vigorously. (USP doesn’t say how long to shake. WHO says intermittently for 10 minutes.) Let the flasks and liquids sit for at least 10 minutes after that, to come to room temperature and to let the liquid absorb any gases. (30 minutes? How long does it take to absorb and cool to room temp?)
Once the flask has cooled and you are getting ready for analysis with the electrode, add a little deionized water to the lip around the stopper and carefully unstopper the flask. The water should flow down, washing the neck of the flask and some of the stem and holder.
Transfer the liquid from the flask into a clean volumetric flask carefully. If any liquid is lost, that is sample/halide lost. Use a funnel if needed, rinsing the funnel with deionized water.
Rinse the flask out with more deionized water, making sure to swirl the water around to get the walls of the flask and any spots that had burned ashes. Do not use more liquid than the volumetric flask that you will be pouring into can hold! Fill the flask to the line with more deionized water, stopper the flask and mix well.
Prepare a beaker of the same amount of liquid as the calibration standards, plus the same amount of booster. Add a small stir bar. Make sure that all beakers are well labeled.
Analysis
Once the electrode has been calibrated and the known standard and sample beakers have been prepared, make sure that you are out of calibration mode and in ion/ppm mode.
Run known standard solution, sample solution, known standard, sample solution, known standard, etc, ending with a known standard, for all of the sample runs. (The sample beaker of known standard solution is used for each turn.) Make sure that the electrode is rinsed off with deionized water and then blotted with a kimwipe after each solution, then placed in the next beaker in the way to prevent bubbles from clinging to the bottom of the electrode.
Let the electrode equilibrate for 1.5 minutes (3 minutes? Looks like the smaller the concentration, the longer it needs to sit.) and then wait for a STABLE indicator. Record the reading.
If the run of samples takes longer than two hours, check a middle of the range standard solution that you used for the calibration. If necessary, recalibrate.
Once everything has been run, turn off the stir plate, rinse off the electrode, blot dry and place the electrode into a beaker of deionized water if you will be using it within the next few days. If necessary, you can put parafilm over the fill hole, but make sure to take the parafilm off before the next analysis.
Using the recorded reading of ppm and the knowledge of how much sample was used for the combustion, as well as the volume of the dilutions made, you can use the halide calculation sheet to determine the concentration of the halide in the compound. You can calculate the milligrams of halide in the dilution volumetric flask. This can then be compared to the theoretical amount of chlorine from the sample.
Other Sample Preparation
Some client samples are already dissolved in solution (preferably aqueous, as the electrode can be damaged by organic solvents). If the client indicates that the compound is completely dissolved in the solution, you do not have to combust the sample. The sample solution can be directly pipetted into a volumetric flask and then diluted with deionized water to create the solution to be analyzed.
Note: Should we say that 25mL volumetric flasks are our smallest dilution? Do not just pour the diluted contents of the flask into the analysis beaker, as that is not accurate. Ex. If you dilute something to 25mL, use 20mL of it for the analysis. You will need enough solution to cover the bottom of the electrode.
Using the concentration of the sample provided by the client and the amount of liquid given by the client, you can calculate the theoretical concentration of the halide in the amount of liquid that you will be using for the dilution. If the theoretical diluted ppm of the volumetric flask is below the limit of detection, the results will not be accurate.
Once the sample has been diluted, proceed the same as the analysis after the combustion flask fluid has been diluted. You can calculate the milligrams of halide in the dilution volumetric flask and then the ppm of the halide in the amount of solution that you diluted.